This is default featured post 1 title
Go to Blogger edit html and find these sentences.Now replace these sentences with your own descriptions.This theme is Bloggerized by Lasantha Bandara - Premiumbloggertemplates.com.
This is default featured post 2 title
Go to Blogger edit html and find these sentences.Now replace these sentences with your own descriptions.This theme is Bloggerized by Lasantha Bandara - Premiumbloggertemplates.com.
This is default featured post 3 title
Go to Blogger edit html and find these sentences.Now replace these sentences with your own descriptions.This theme is Bloggerized by Lasantha Bandara - Premiumbloggertemplates.com.
This is default featured post 4 title
Go to Blogger edit html and find these sentences.Now replace these sentences with your own descriptions.This theme is Bloggerized by Lasantha Bandara - Premiumbloggertemplates.com.
This is default featured post 5 title
Go to Blogger edit html and find these sentences.Now replace these sentences with your own descriptions.This theme is Bloggerized by Lasantha Bandara - Premiumbloggertemplates.com.
- Introduction of Basic Electronics
- Identification and workign of Basic Components
- Use of Multimeter
- Practical Testing of Basic Component bu Multimeter
- Introduction of Mobile Phone Technology
- Types of Technology
- Working Principles of Mobile
- Features of Mobile Phone
- Introduction of Microchip & Microprocessor
- Identification of different types of Microchip & Microprocessor
- Searching the Processor in Different types of Mobile.
- Soldering & D-soldering of Microchip and MicroProcessor
- Use of micro Iron , SMD Machines , Hotgun etc.
- Soldering & D-Soldering Practice.
- Chip type Component removing & replacing
- Jumper Connect Practically( Antina switch jumper , track break jumper , Display cont. jumper , Drive IC Jumper)
- Display & patta Changing practice.
- BGA IC removing , rebolling and replacing practice.
- P.F.O. changing .
- Jack changing practically (Sim jack , Charging jack , Hand free jack , Battery Connector).
- Bluetooth module changing practically.
Many types of section circuit diagram, (Ex. Charging section, CPU sec.) etc.
(ii)
Basic computer knowledge , logo manager, ringtones, wallpaper, songs,
Games, pictures proper installation in mobile.
(iii)
Flashing by USF, DCT.
(iv)
Installation of Application programs & other programs.
(v)
Locking & unlocking .
(vi)
Cardreader, Bluetooth, DKU.
Track reading in circuit diagram books
(ii)
Track checking in mobile practically by multimeter
(iii)
Cool testing in Mobile
(iv)
Hot testing in Mobile
(v)
Fault find related to Software, (Ex.- Sim locked, Sim rejected, Hanging problem,
Restart problem ) etc.
(vi)
Fault find related to Hardware, (Ex.- Dead, Network problem, Simcard rejected,
Mic/Speaker not working, No charging, No vibration ) etc.
Some of the major advantage of mobile repairing course are :
1. You will have technical hand , you can easily earn income
2. There is huge requirement for Mobile repairing specialists .
Read more: http://www.articlesbase.com/tutoring-articles/mobile-repairing-course-1871444.html#ixzz1HaNetlBf
Under Creative Commons License: Attribution
 2. In the ” Run” Window type this command ” Control userpasswords2 ” without the quotes and click OK.
 3. After this, a window called ” User Accounts”. Now, Untick the option of ” users must enter a user name and password to use this computer” and then click apply.
 4. After you click apply, a window will pop up with user name and password. Just fill this with the password associated with this account and save it.
 That’s all. After doing all this, when you start your system next time then it wont ask for password to log in. It will automatically log in the user account you choose above.
- Click the ‘Start Button’ on your Desktop.
- Type “cmd” in the search field and open command prompt in Administrator mode {Right Click and select “Run as administrator”}. It you still have UAC enabled, it will ask you for permissions, click “OK”.
- Type “fsutil resource setautoreset true C:” {assuming that you have your OS on drive C }
- Reboot your computer.
What is IP address?
If you aren't sure what IP address is, IP (Internet Protocol) address is a unique address that identifies a computer or a device on the Internet. It contains 32 bits or 4 bytes (octets) and is written in four sets of decimal numbers separated by a period (or dot) in between. Each set of decimal numbers represents a byte (i.e. 8 bits) and can not exceed 255, that is when all the eight bits are 1 (or 11111111). Example of IP address: 202.60.80.1An IP address is comparable to a telephone number that uniquely identifies an individual or a business on the telephone network.
==>> The anatomy of IP address
Every computer or device on the Internet is part of a network (e.g. ISP, corporate, or home network). That's why IP address body (i.e. xxx.xxx.xxx.xxx where x is a decimal number) consists of network identity (ID) and host (i.e. node/device) ID. A subnet mask value which resembles an IP address is usually given along with an IP address to help identify which part of the address refers to network ID or host ID. Subnet is logical grouping of hosts in a network that functions to segregate traffic.In a class A IP address, the first byte refers to network ID and the last three bytes refer to host ID. In a class B IP address, the first two bytes refer to network ID and the last two bytes refer to host ID. In class C IP address, the first three bytes refer to network ID and the last byte refers to host ID. Class A IP addresses are used by very big networks, class B by medium to large networks, while class C by small networks.
| From | To | Default subnet mask | |
| Class A | 0.0.0.0 | 127.255.255.255 | 255.0.0.0 |
| Class B | 128.0.0.0 | 191.255.255.255 | 255.255.0.0 |
| Class C | 192.0.0.0 | 223.255.255.255 | 255.255.255.0 |
What is my IP address?
Your IP address currently is 119.73.71.173When your computer (be it a desktop PC, laptop/notebook, netbook, tablet, handheld/PDA, or smart phone) accesses the Internet, it has an IP address that is assigned to it by your ISP or a broadband router in your home or company network. IP address is different with MAC address. A MAC address or physical address was assigned to a device by its manufacturer and stays the same during its lifetime while IP address depends on the network or service provider through which your computer or device gets an Internet connection.
For example, if you use Windows XP, to check your IP address, do one of the following:
1) double-click your Internet connection icon on the taskbar and click the Details tab.
2) open the Command Prompt window and type this command : ipconfig or ipconfig /all. You can go to the Command Prompt through Start > All Programs > Accessories > Command Prompt. [To find Command Prompt in Windows Vista or Windows 7, just click Start button and type cmd in the search box and press Enter.]
3) go to Network Connections folder, click on your Internet connection name, and see your IP address on the Details pane on the bottom left of the folder. You can go to the Network Connections folder through Start > Connect To > Show all connections or through Control Panel. [In Windows Vista or Windows 7, right click a connection icon on the taskbar/system tray, select Network and Sharing Center. On the left pane, select Manage network connections to open Network Connections folder. Right click an active connection, select Status, and click Details.]
Dynamic IP address vs. static IP address
When your computer connects to your ISP, your ISP assigns an IP address to it. In the case of dial-up access over telephone line or broadband access (e.g. DSL or cable modem) using PPPoE/PPPoA that requires log-in, your computer will get a different IP address each time it connects to the ISP and makes an Internet connection through it. This address is called dynamic IP address. The IP address is assigned by a DHCP server at your ISP. This this the most common case since every ISP has limited IP addresses stock. On the other hand, using an always-on broadband connection, your computer is usually given the same IP address all the time by the ISP. This address is called static IP address.Dynamic IP address is assigned to your computer by a broadband router (or residential gateway) if your computer is on a LAN (home or office network) and accesses the Internet through a broadband router. But this address is for internal use only, it gets converted to a public IP address when communicating over the Internet. Dynamic IP address assignment is handled by a DHCP server at the router. The DHCP server can be set to reserve an IP address for a computer during a connection or change it periodically at a predefined interval. The router also handles the network address translation (NAT), i.e. converting private IP address assigned by the DHCP to a public IP address assigned by the ISP.
Private IP address vs. public IP address
Private IP address is only used within a LAN or an internal network (e.g. home or company network), while public IP address is used for communication over the Internet. If your computer is part of a company network, chances are it is assigned a private IP address and when it connects to the Internet the private IP address is translated to a public IP address by a router which has NAT capability. Private IP address is also known as internal IP address, while public IP address is external IP address. LAN IP address is always a private IP address, while WAN IP address can be a private or public IP address. This article clarifies the difference between LAN IP address and WAN IP address.OK, in case you are wondering, the table below tells you which IP addresses are allocated for use only in internal networks as private IP addresses.
| IP address class | private IP address range | |
| From | To | |
| Class A | 10.0.0.0 | 10.255.255.255 |
| Class B | 172.16.0.0 | 172.31.255.255 |
| Class C | 192.168.0.0 | 192.168.255.255 |
What is the function of IP address?
IP addresses are used by devices called routers on the Internet to forward messages from one computer to another over the Internet. In comparison to a telephone network, a router acts like a telephone switch (exchange) that connects a caller to the dialed phone number.When you send a message over the Internet, the message is broken down into small pieces - called packets - where each packet can take its own route. IP addresses information is included in the packet header. Your computer sends each packet along with your computer (i.e. source) IP address and the receiving computer (i.e. destination) IP address. The routers read the source and the destination IP addresses by examining a packet header and forward the packet accordingly.
However, you usually type a web address (e.g. www.conniq.com) instead of an IP address in your browser's address bar. That's because there are servers on the Internet that store the mapping of web addresses to IP addresses. They are called DNS servers. The DNS servers handle the translation from a web address to an IP address. A DNS server is analogous to a telephone directory that contains a list of telephone numbers and businesses or individuals who own the numbers.
==>> How many routers do forward my message before arriving at a specific web address?
Your message does not get to the destination address via one router. There are many routers involved in forwarding your message to the destination computer (i.e. in this case, a web server). You can do little investigation by typing tracert ip_address or tracert web_address in Command Prompt. Replace the ip_address or web_address part after tracert with your destination, e.g. www.myexampledestination.com. This command will trace the routes that take your message to its destination by sending ICMP messages. Some routers have been set not to accept an ICMP message from the Internet therefore you won't get a reply. But since many allow it, by reading the result you would be amazed at how far your message can travel in milliseconds and how many hops it makes to get to its destination.How will the website I visit use my IP address?
Your IP address can be used for location targeting that is identifying where you come from and presenting you relevant content tied to your geographic location. That's because IP addresses in bulk are allocated to regions and countries around the world by the IANA in a delegated manner through several Regional Internet Registries. And each ISP obtains IP addresses for its subscribers from Local or National Internet Registry.Nonetheless, a website you visit can not know who you are, solely from your IP address. Unless you register to the website and gives it your personal information, you will remain anonymous.
* CTRL+X (Cut)
* CTRL+V (Paste)
* CTRL+Z (Undo)
* DELETE (Delete)
* SHIFT+DELETE (Delete the selected item permanently without placing the item in the Recycle Bin)
* CTRL while dragging an item (Copy the selected item)
* CTRL+SHIFT while dragging an item (Create a shortcut to the selected item)
* F2 key (Rename the selected item)
* CTRL+RIGHT ARROW (Move the insertion point to the beginning of the next word)
* CTRL+LEFT ARROW (Move the insertion point to the beginning of the previous word)
* CTRL+DOWN ARROW (Move the insertion point to the beginning of the next paragraph)
* CTRL+UP ARROW (Move the insertion point to the beginning of the previous paragraph)
* CTRL+SHIFT with any of the arrow keys (Highlight a block of text)
* SHIFT with any of the arrow keys (Select more than one item in a window or on the desktop, or select text in a document)
* CTRL+A (Select all)
* F3 key (Search for a file or a folder)
* ALT+ENTER (View the properties for the selected item)
* ALT+F4 (Close the active item, or quit the active program)
* ALT+ENTER (Display the properties of the selected object)
* ALT+SPACEBAR (Open the shortcut menu for the active window)
* CTRL+F4 (Close the active document in programs that enable you to have multiple documents open simultaneously)
* ALT+TAB (Switch between the open items)
* ALT+ESC (Cycle through items in the order that they had been opened)
* F6 key (Cycle through the screen elements in a window or on the desktop)
* F4 key (Display the Address bar list in My Computer or Windows Explorer)
* SHIFT+F10 (Display the shortcut menu for the selected item)
* ALT+SPACEBAR (Display the System menu for the active window)
* CTRL+ESC (Display the Start menu)
* ALT+Underlined letter in a menu name (Display the corresponding menu)
* Underlined letter in a command name on an open menu (Perform the corresponding command)
* F10 key (Activate the menu bar in the active program)
* RIGHT ARROW (Open the next menu to the right, or open a submenu)
* LEFT ARROW (Open the next menu to the left, or close a submenu)
* F5 key (Update the active window)
* BACKSPACE (View the folder one level up in My Computer or Windows Explorer)
* ESC (Cancel the current task)
* SHIFT when you insert a CD-ROM into the CD-ROM drive (Prevent the CD-ROM from automatically playing)
* CTRL+SHIFT+ESC (Open Task Manager)
* CTRL+SHIFT+TAB (Move backward through the tabs)
* TAB (Move forward through the options)
* SHIFT+TAB (Move backward through the options)
* ALT+Underlined letter (Perform the corresponding command or select the corresponding option)
* ENTER (Perform the command for the active option or button)
* SPACEBAR (Select or clear the check box if the active option is a check box)
* Arrow keys (Select a button if the active option is a group of option buttons)
* F1 key (Display Help)
* F4 key (Display the items in the active list)
* BACKSPACE (Open a folder one level up if a folder is selected in the Save As or Open dialog box)
* Windows Logo+BREAK (Display the System Properties dialog box)
* Windows Logo+D (Display the desktop)
* Windows Logo+M (Minimize all of the windows)
* Windows Logo+SHIFT+M (Restore the minimized windows)
* Windows Logo+E (Open My Computer)
* Windows Logo+F (Search for a file or a folder)
* CTRL+Windows Logo+F (Search for computers)
* Windows Logo+F1 (Display Windows Help)
* Windows Logo+ L (Lock the keyboard)
* Windows Logo+R (Open the Run dialog box)
* Windows Logo+U (Open Utility Manager)
* Left ALT+left SHIFT+PRINT SCREEN (Switch High Contrast either on or off)
* Left ALT+left SHIFT+NUM LOCK (Switch the MouseKeys either on or off)
* SHIFT five times (Switch the StickyKeys either on or off)
* NUM LOCK for five seconds (Switch the ToggleKeys either on or off)
* Windows Logo +U (Open Utility Manager)
* HOME (Display the top of the active window)
* NUM LOCK+Asterisk sign (*) (Display all of the subfolders that are under the selected folder)
* NUM LOCK+Plus sign (+) (Display the contents of the selected folder)
* NUM LOCK+Minus sign (-) (Collapse the selected folder)
* LEFT ARROW (Collapse the current selection if it is expanded, or select the parent folder)
* RIGHT ARROW (Display the current selection if it is collapsed, or select the first subfolder)
After you double-click a character on the grid of characters, you can move through the grid by using the keyboard shortcuts:
* LEFT ARROW (Move to the left or to the end of the previous line)
* UP ARROW (Move up one row)
* DOWN ARROW (Move down one row)
* PAGE UP (Move up one screen at a time)
* PAGE DOWN (Move down one screen at a time)
* HOME (Move to the beginning of the line)
* END (Move to the end of the line)
* CTRL+HOME (Move to the first character)
* CTRL+END (Move to the last character)
* SPACEBAR (Switch between Enlarged and Normal mode when a character is selected)
* CTRL+N (Open a new console)
* CTRL+S (Save the open console)
* CTRL+M (Add or remove a console item)
* CTRL+W (Open a new window)
* F5 key (Update the content of all console windows)
* ALT+SPACEBAR (Display the MMC window menu)
* ALT+F4 (Close the console)
* ALT+A (Display the Action menu)
* ALT+V (Display the View menu)
* ALT+F (Display the File menu)
* ALT+O (Display the Favorites menu)
* ALT+Minus sign (-) (Display the window menu for the active console window)
* SHIFT+F10 (Display the Action shortcut menu for the selected item)
* F1 key (Open the Help topic, if any, for the selected item)
* F5 key (Update the content of all console wind
* CTRL+F10 (Maximize the active console window)
* CTRL+F5 (Restore the active console window)
* ALT+ENTER (Display the Properties dialog box, if any, for the selected item)
* F2 key (Rename the selected item)
* CTRL+F4 (Close the active console window. When a console has only one console window, this shortcut closes the console)
* ALT+PAGE UP (Switch between programs from left to right)
* ALT+PAGE DOWN (Switch between programs from right to left)
* ALT+INSERT (Cycle through the programs in most recently used order)
* ALT+HOME (Display the Start menu)
* CTRL+ALT+BREAK (Switch the client computer between a window and a full screen)
* ALT+DELETE (Display the Windows menu)
* CTRL+ALT+Minus sign (-) (Place a snapshot of the entire client window area on the Terminal server clipboard and provide the same functionality as pressing ALT+PRINT SCREEN on a local computer.)
* CTRL+ALT+Plus sign (+) (Place a snapshot of the active window in the client on the Terminal server clipboard and provide the same functionality as pressing PRINT SCREEN on a local computer.)
* CTRL+E (Open the Search bar)
* CTRL+F (Start the Find utility)
* CTRL+H (Open the History bar)
* CTRL+I (Open the Favorites bar)
* CTRL+L (Open the Open dialog box)
* CTRL+N (Start another instance of the browser with the same Web address)
* CTRL+O (Open the Open dialog box, the same as CTRL+L)
* CTRL+P (Open the Print dialog box)
* CTRL+R (Update the current Web page)
* CTRL+W (Close the current window)
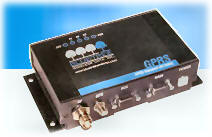
- BT-2010 GPRS Standard GSM Cellular Modem with GPS
- RUGGED - RELIABLE - HIGH PERFORMANCE
|  |
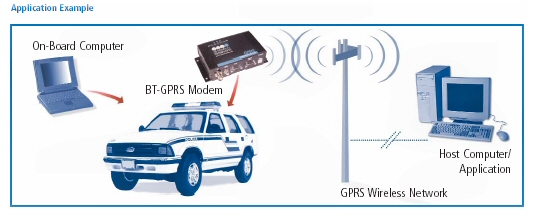
- Police, Fire, EMS and other Emergency Services
- Public Transit and Transportation
- Vehicle Tracking - AVL
- Field Service & Mobile
- Dispatch
- Utility Automatic Meter
- Reading (AMR)
- Automated machine-to-machine
- (M2M)
- Telemetry and SCADA
Mesh Network with WiFi And WiMAX
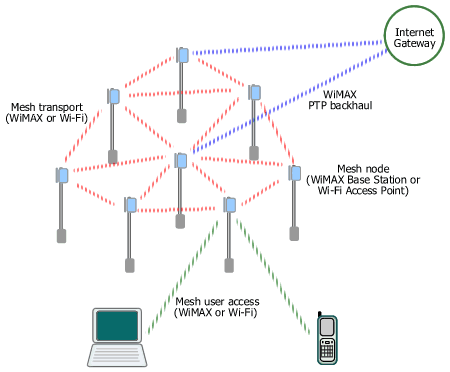
WiMAX can work on all layers of a municipal mesh network (hotzone/metro zone).
Backhauls for mesh Wi-Fi networks are provided using various wired and wireless solutions, i.e. fiber optic, leased line, DSL, and proprietary point-to-point (PTP) or point-to-multipoint (PMP) radio including some pre-WiMAX equipment. A wireless backhaul - specifically WiMAX - enables flexible placement of a mesh gateway node anywhere in the network, therefore it doesn't have to be located in a telco's CO or close to a fiber/DSL termination point. The portable WiMAX equipment (Base Station) also allows fast installation and easy relocation. Moreover, WiMAX was designed for outstanding performance in NLOS environment, typical in metro area with many high rise buildings. WiMAX also can operate either on licensed or unlicensed band, giving more options for operator/ISP/municipality in addressing various interference conditions and users' requirements.
The mesh transport layer provides the interconnection between mesh nodes. There is a project in the IEEE to standardize Wi-Fi as an intra-mesh transport solution, but the work is still in progress. The current established Wi-Fi solution uses proprietary technology developed by each vendor which might cause interoperability issues in the future. WiMAX can naturally replace Wi-Fi in this layer, interconnecting mesh nodes using standard equipment based on the IEEE 802.16-2004 or 802.16e which includes support for optional mesh topology. Besides, WiMAX has built-in QoS support and is optimized for longer distance (WiMAX is a wireless MAN while Wi-Fi is a wireless LAN) .
For mesh access layer, at present users connect using their Wi-Fi-enabled laptops, PDAs, or smart phones. WiMAX integration into such portable/mobile devices is still in its early stage of development. However, in several months/years to come one may expect the emergence of dual-mode Wi-Fi/WiMAX devices and network adapters (NIC, PC card, PCI Express) which can connect automatically to any available network with the best signal.
The first step is to DOWNLOAD RASPPPoE. You can do this with your alternative backup dialup service if you don't have an alternate Internet connection. Use the "Download and install" link on the left, and you'll want to download the version marked "32-bit release for x86 machines". Once you've completed the download, unzip the file into a temporary directory (such as C:\RASPPPoE).
Click "Start" then "Settings" then "Control Panel", then browse to "Network and Dial-Up Connections"
Download Patch:
Right-click "Local Area Connection" and select "Properties".
In the properties dialogue box, click the "Install" button.
In the "Select Network Component Type" window, select "Protocol" and click the "Add" button.
In the "Select Network Protocol" window, click the "Have Disk" button.
In the "Install From Disk" window, either type the name of the temporary directory to which you extracted RasPPPoE, or click the "Browse" button to navigate to it, and then click the "OK" button.
A new window opens, offering the "PPP over Ethernet Protocol" for installation. Click "OK" to start installing the protocol.
After the "PPP over Ethernet Protocol" is installed, return to the "Local Area Connection Properties" window and click "Close" to close the window. The protocol is now fully functional, but you still need to create a dialup connection to use it.
Click the "Start" button on the taskbar and select "Run" to bring up the "Run" dialogue box. Type raspppoe into the box and click the "OK" button to run the dialup Connection Setup application.
A dialogue box appears with a combo box labelled "Query available PPP over Ethernet Services through Adapter" at the top.
Select the network adaptor to which your broadband modem is connected from the list. If the protocol is only operating on one network adapter, the box will be greyed out, as there is no choice to make. Click the "Query Available Services" button. The application will send out a query for offered services and display the result in the list view below.
Click the "Create a Dial-Up Connection" for the selected "Adapter button".
Shortly afterwards, a shortcut to the new dialup connection named "Connection through (adaptor name)" should show up on your desktop.
Rename the connection icon to iiNet ADSL Connection.
To start the connection to the Internet, double-click the "iiNet ADSL Connection" icon. If it's the first time you've started the connection, you'll need to fill in the following fields:
- Username: Enter your full iiNet username, e.g. john.citizen@iinet.net.au
- Password: Enter your password as supplied by iiNet
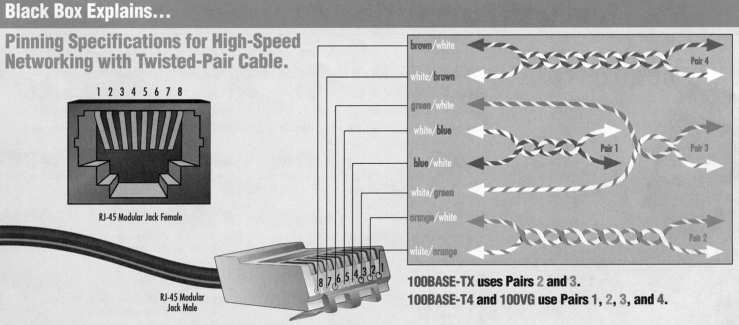
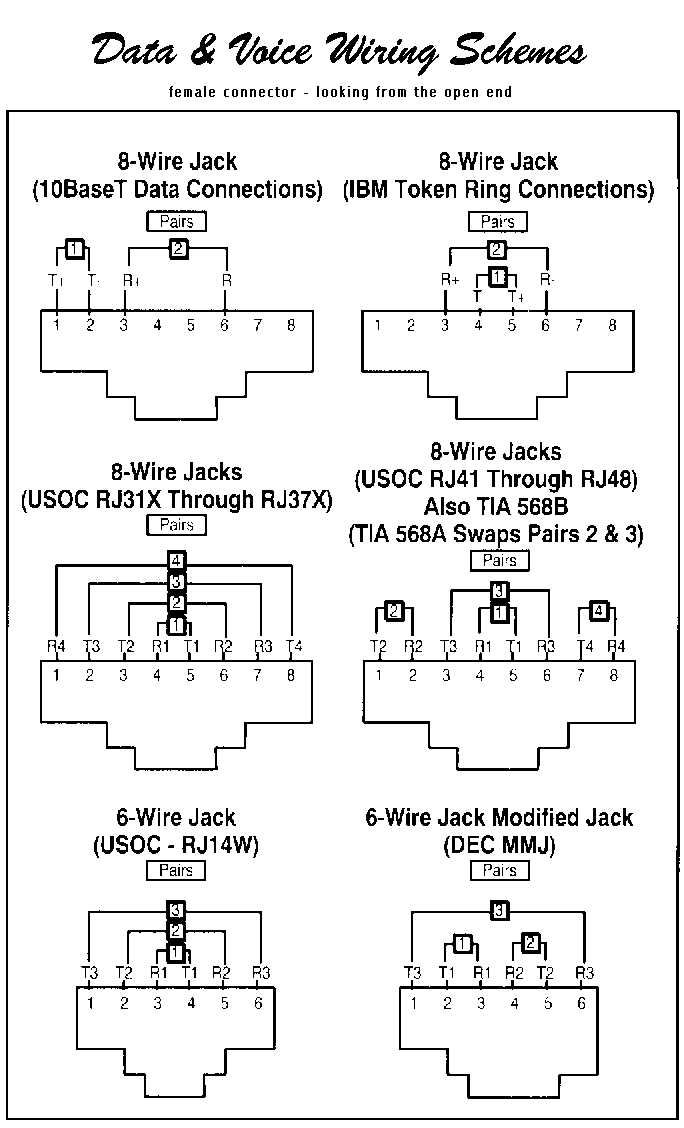
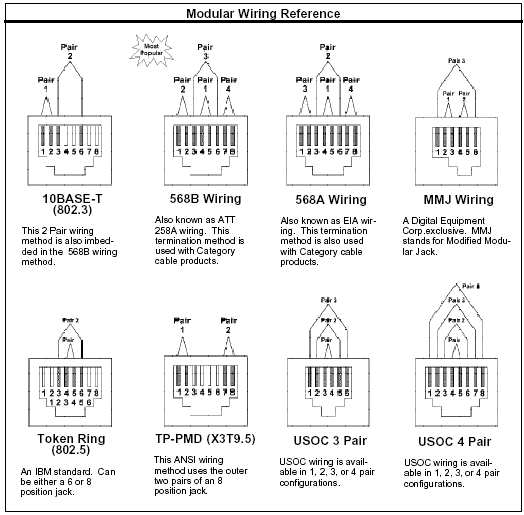
| Pin | Color |
| 1 | white/orange |
| 2 | orange |
| 3 | white/green |
| 4 | blue (not used) |
| 5 | white/blue (not used) |
| 6 | green |
| 7 | white/brown |
| 8 | brown |
|
|

and also available in VAC power 10BaseT and 100BaseT Ethernet switch
Features
| 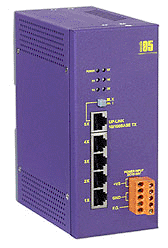 |
The ANS – 105 provides an inexpensive flexible solution for small to medium sized applications that need DC power with a DIN rail mounting and auto-negotiation for connection speed and duplex type . It is ideal for the those industrial applications.
Specifications
- Port Configuration: Auto-negotiation for connection speed and duplex type
- Connector: Shielded RJ-45 Jack
- Cables:
- 10 Base-T (Cat.3,4,5 UTP cable, 100m max.)
- 100 Base-T (Cat.5 UTP cable, 100m max.)
- Filtering Address: Unicast / Multicast / Broadcast address: 8K MAC addresses per unit
- Filtering rate: 14,880 pps for Ethernet, 148,800 pps for Fast Ethernet
- Forwarding rate: 14,880 pps for Ethernet, 148,800 pps for Fast Ethernet
- RAM Buffers: 2MB
- LEDs:
- Power status
- 10/100, Link/Activity, Duplex/Collision status for each port
- Environment:
- Temperature: 0 ~ 60 C degree
- Relative Humidity: 10% to 90% non-condensing
- Dimension: 160 mm x 70 mm x 125 mm
- Power: DC 10 ~ 30 V, 7W
- AC power options
24V/1A power supply (DIN-Rail mounting)

ADN-KA52F24V/1.7A power supply

DP-64024V/0.1 AMP

PWR-2
| Flexpoint 100FF |
Single-Mode to Multimode or |
Multimode to Single-Mode |
Fiber Converters |
for 100FX -100TX Fast Ethernet | 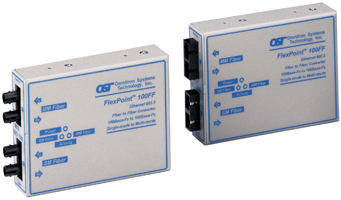 |
Available with SC and ST connectors in a variety of both multimode and single-mode fiber combinations.
Operates in half duplex or full duplex.
Supports 10Base-FL, 100Base-Fx and IEEE 802.3 specifications.
Wall-mountable or rack-mountable on a 5-unit shelf or in the 14 unit power-redundant FlexPoint Powered Chassis.
Out-of-the-box plug-and-play operation.
Software-independent.
Lifetime warranty.
| FlexPoint 100 FF | ||
Fiber: | SC or ST | |
Multimode: | 50/125, 62.5/125, 100/140 µm | |
Single-Mode: | 9/125 µm | |
| Ethernet and Token Ring: | ||
| Multimode: | 5 km/16,400 ft. | |
| Single-Mode: | 20 km/66,000 ft. | |
Fast Ethernet: | Half-Duplex | Full-Duplex |
MM/Sx, 850 nm: | 412 m/1,350 ft. | 500 m/1,640 ft. |
MM/Lx, 1300 nm: | 412 m/1,350 ft. | 5 km/3.1 mi. |
SM/Lx, 1300 nm: | 412 m/1,350 ft. | 28 km/16.8 mi. |
SM/Lx/LH, 1300 nm: | 412 m/1,350 ft. | 58 km/36 mi. |
Power: | LED, Yellow, power applied | |
Fiber Link/ Receive: | LED, Green, Link/ data received | |
| W:3.0"xD:4.0"xH:1.0"/ 6 oz. | ||
| 9 VDC/500 mA or 5 VDC/750 mA | ||
| Temperature: | Operating: 0 to 70 degrees C | |
| Storage:: -40 to 80 degrees C | ||
Humidity: | 0-90% (non-condensing) | |
DC power the X will be 0
as in 4411-0
115VAC power the X will be 1
as in 4411-1
220VAC power the X will be 2
as in 4411-2
| Model | Port 1 | Port 2 | ||
Media Type | Distance | Media Type | Distance | |
| 4411-x | MM/SC/Lx 1310 nm | 5 km | SM/SC/Lx 1310 nm | 28 km |
| 4412-x | MM/ST/Lx 1310 nm | 5 km | SM/ST/Lx/LH 1310 nm | 58 km |
| 4413-x | MM/SC/Lx 1310 nm | 5 km | SM/SC/Lx/LH 1310 nm | 58 km |
| 4410-x | MM/ST/Lx 1310 nm | 5 km | SM/ST/Lx 1310 nm | 28 km |
| 4414-x | MM/ST/Sx 850 nm | 500 m | SM/ST/Lx 1310 nm | 28 km |
| 4415-x | MM/SC/Sx 850 nm | 500 m | SM/SC/Lx 1310 nm | 28 km |
| 4416-x | MM/ST/Sx 850 nm | 500 m | SM/ST/Lx/LH 1310 nm | 58 km |
| 4417-x | MM/SC/Sx 850 nm | 500 m | SM/SC/Lx/LH 1310 nm | 58 km |
| 4418-x | MM/ST/Sx 850 nm | 500 m | MM/ST/Lx 1310 nm | 5 km |
| 4419-x | MM/SC/Sx 850 nm | 500 m | MM/SC/Lx 1310 nm | 5 km |
| 4420-x | MM/ST 1310 nm | 5 km | MM/ST 1310 nm | 5 km |
| 4421-x | MM/SC 1310 nm | 5 km | MM/SC 1310 nm | |


